|
Day
18
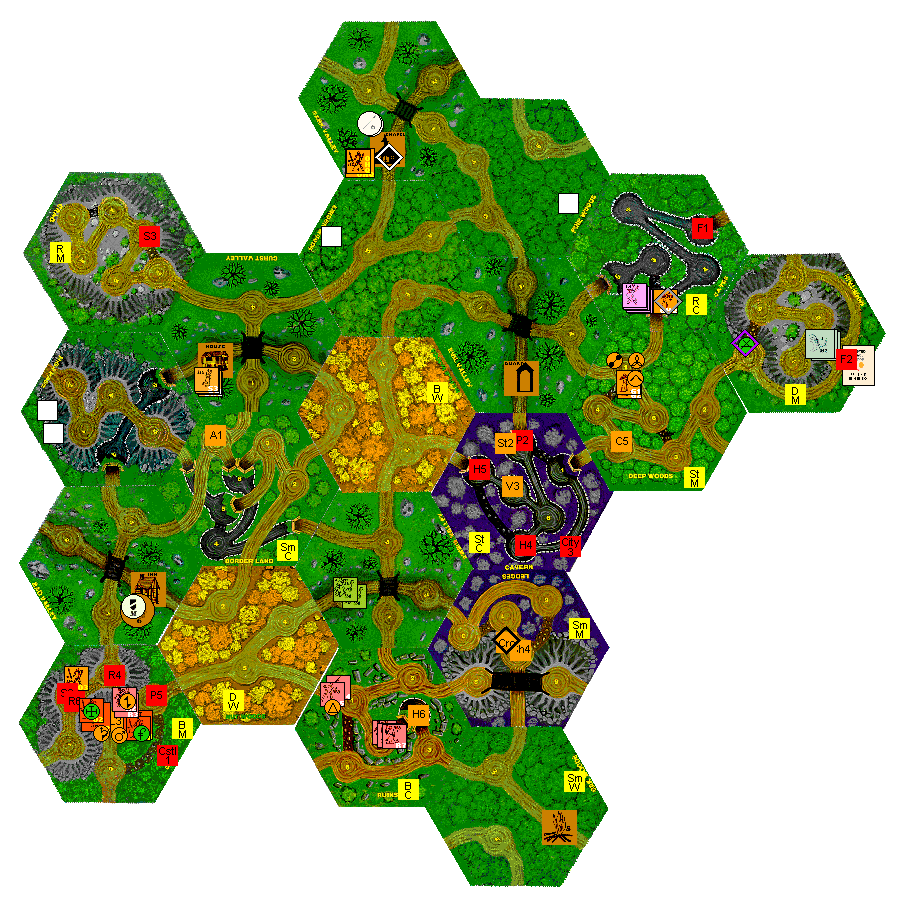
The Black Knight shares the location of the Lair with his buddies,
the Swordsman and Berserker, and together they loot the site down
to the last treasure. The White Knight and Pilgrim arrive hidden
in the clearing later in the day, locate the Lair on their own,
but find it nearly empty. The Dwarf and Captain follow the Wizard
along a hidden path toward the Caves, but GHQ, arriving in the Caves
before them, finds only monster signs and sounds and is blocked
by six Ax Goblins. The Sorceror gets his hirelings to follow him
this time and heads off toward Ruins where he un-enchants the tile
to its original side. The Witch King does R&R to create more
color magic, and forturnately doesn't draw any monsters this day.
As evening falls, the Swordsman, Berserker, and Black Knight feel
that their clearing is more crowded than it was, but they can't
see anyone else.
In combat, the GHQ falls victim to the Ax Goblins, and in Cliff
3 an apparently stalled negotiation is hastened to a successful
conclusion when the White Knight and Pilgrim alert their weapons.
After two uneventful but suspense-filled rounds of combat, the White
Knight runs away into the secret passage, and the Swordsman, after
negotiating with a talking bush, gives the Good Book to the still-hidden
Pilgrim in exchange for the Power Gauntlets and 6 gold. The Pilgrim
then activates the Good Book and the Swordsman activates the Power
Gauntlets. Elsewhere the Captain gives the Toadstool Ring, with
its extra Spell phase, to the Wizard.

BIRDSONG
O1 follows Pilgrim
O2 follows White Knight
Dwarf follows Wizard
Captain, G1, and, G2 follow Wizard
R5, R4 follow Sorceror
DAYLIGHT
Monster Roll=3
Ogres, Wolves, Goblins, the Octopus, the Patrol, and the Ghosts
are prowling.
Tiago Espadafiada, the SWORDSMAN, at Cliff 3, site of Lair
S / S / S / S
Chooses to move first
Receives location of Lair from Black Knight
Gives location of CL3-CL6 Secret Passage to Black Knight and Berserker.
Loots the Lair(2,2). Takes 2nd treasure from top.
Loots the Lair(3,3). Takes 3rd treasure from top.
Loots the Lair(6,5). Takes nothing.
Loots the Lair(3,3). Takes 3rd treasure from top.
Nothing arrives.
Raq'nyvarkryn, the WITCH KING, at Mountain 4.
H / R / R / SPX* / SP
Hides(5,3)
Rests Magic V3*
Rests Magic V3*
Enchants Magic V3* to Black magic
Nothing arrives.
Gondaff, the WIZARD, at Deep Woods 5, site of Cairns.
M-DW4 / M-DW1 / R / T
Moves to Deep Woods 4
Moves to Deep Wood 1 using Hidden Path.
Rests Magic II4*
No native groups available to Trade with.
Nothing arrives.
Faramir, the CAPTAIN, at Deep Woods 5, site of Cairns.
Follows Wizard
Moves to Deep Wood 2
(Discovers DW4-DW1 Hidden Path)
Rests Move M4*
Put back on board after Wizards turn.
Nothign arrives.
Balin, the DWARF, at Deep Woods 5, site of Cairns.
Follows Wizard
Moves to Deep Woods 2
(Discovers DW4-DW1 Hidden Path)
Rests Fight T5**
Put back on board after Wizard's turn.
Nothing arrives.
Rungnir, the BERSERKER, at Cliff 3, site of Lair.
S / S / S / S
Receives location of Lair from Black Knight
Loots Lair(5,2). Takes nothing.
Loots Lair(5,5). Takes nothing.
Loots Lair(3,2). Takes 3rd treasure in Lair.
Loots Lair(3,1). Takes 3rd treasure in Lair.
Nothing arrives.
Sir Duncan the Tall, the WHITE KNIGHT, at Cliff 6
H / H / R* (Health) / M-CL3 / S
Hides(4,1).
Cancels hide roll.
Rests Fight H5*
Moves to Cliff 3.
Searches on Locate Table(4,3). Discovers Lair.
Nothing arrives.
Kael, the BLACK KNIGHT, at Cliff 3, site of Lair
S / S / S / S
Loots Lair(2,1). Takes 2nd treasure in Lair.
Loots Lair(5,3). Takes nothing.
Loots Lair(6,4). Takes nothing.
Loots Lair(5,1). Takes nothing.
Nothing arrives.
GHQ, the hired HQ, at Deep Woods 6
M-DW1 / M-CA2
Moves to Caves 2
At end of turn reveals Flutter 1 and Ruins C
Six Ax Goblins drawn by Ruins C arrive in Caves 2 and block GHQ.
Preston, the PILGRIM, at Cliff 6.
H / H / M-CL3 / S
Fails to hide(6,4).
Hides(5,3).
Moves to Cliff 3.
Received location of Lair from White Knight.
Loots Lair(6,2). Takes nothing.
Nothing arrives.
Tim, the SORCEROR, at Ledges 4, site of Shire.
M-OW2* (workhorse) / M-RU3 / M-RU5 / M-RU1 / SPX* / SP
Moves to Ruin 1
Enchants Ruins tile back to Green side using Magic IV3* and Purple
magic from enchanted Magic IV4* (fatigues).
Nothing arrives.
EVENING
Cliff 3
Berserker, Black Knight, and Swordsman (with R2 and R3) are unhidden.
Pilgrim, White Knight, 02, and O3 are hidden.
Caves 2
GHQ is unhidden and blocked by 6 Ax Goblins.
Deep Woods 1
Dwarf, Wizard, Captain, G1, and G2 are unhidden.
Ruins 1
Sorcerer, R3, and R4 are unhidden.
Mountain 4
Witch King is hidden.
COMBAT
Caves 2
GHQ is unhidden. Six Ax Goblins are light side up (L4/3)
Round 1
1. Encounter Step
a. Luring: none
b. Random Assignment: All six Ax Goblins are assigned to attack
GHQ
c. Deployment/Charging: none
d. Actions: none
2. Melee Step
a. Selecting Targets: GHQ selects Goblin1 as target.
b. Spell Effects: none
c. Attack/Maneuvers:
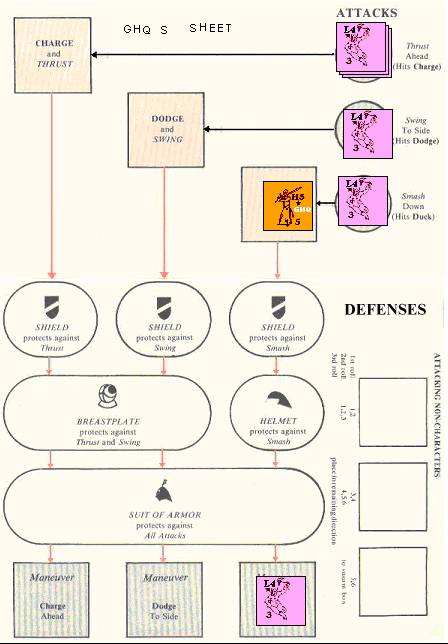
GHQ goes in Duck&Smash red box on own sheet
Goblin1 goes is put in Duck Maneuver box as GHQ's target
Goblin2 is placed in Smash attack circle
Goblin3 is placed in Swing Attack circle
Goblin4, Goblin5, and Goblin6 are placed in Thrust Attack circle
(All Attack circles must be filled)
(See image)

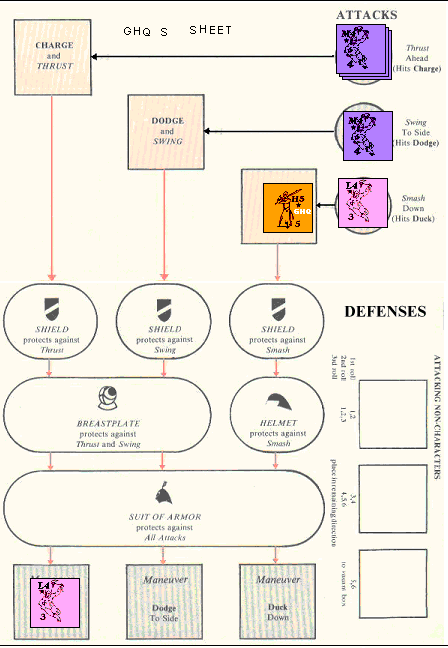
d. Repositioning/Change Tactics
Goblin1 repositioning roll=5(move right).
Goblin1 moves to Charge Maneuver box and doesn't change tactics(2,1).
Attacking Goblins repositioning roll=1(top box unchanged).
Goblin2 goes to Swing and changes tactics to M4/4 (6,4).
Goblin3 goes to Smash and doesn't change tactics (3,1).
Goblin4-Goblin6 stay in Thrust and change tactics to M4/4 (6,4)
GHQ, on his own sheet, does not reposition or change tactics
(See image)

e. Resolving Attacks
GHQ misses
Goblin1 hits by undercutting
Goblin3 hits by matching directions
Goblin2 hits by undercutting
Goblin4-Goblin6 hit by undercutting
f. Inflicting Harm:
Goblin1 does Light damage + Fumble Table[(4,1)-1(speed differential)+4(doesn't
match directions=7(decrease one level)]=Negligible harm.
Goblin2 does Medium damage + Fumble Table[(5,1)-1(speed differential)+4(doesn't
match directions)=8(decrease one levels)]=Light harm.
Goblin3 does Light damage + Fumble Table[(3,1)-1(speed differential)=2(increase
one level)]=Medium harm.
Goblin4 does Medium damage + Fumble Table[(6,6)-1(speed differential)+4(doesn't
match directions)=9(decrease two levels)]=Negligible harm.
Goblin5 does Medium damage + Fumble Table[(3,2)-1(speed differential)+4(doesn't
match directions)=6(no change)]=Medium harm.
Goblin6 does Medium damage + Fumble Table[(6,2)-1(speed differential)+4(doesn't
match directions)=9(decrease two levels)]=Negligible harm.
3. Fatigue Step: none
All denizens become unassigned. Goblin2 and Goblin4-Goblin6 remain
dark side up.
Round 2
1. Encounter Step
a. Luring: none
b. Random Assignment: All six Ax Goblins are assigned to attack
GHQ
c. Deployment/Charging: none
d. Actions: none
2. Melee Step
a. Selecting Targets: GHQ selects Goblin1 as target.
b. Spell Effects: none
c. Attack/Maneuvers:
GHQ goes in Duck&Smash red box on own sheet
Goblin1 goes is put in Duck Maneuver box as GHQ's target
Goblin2 is placed in Smash attack circle
Goblin3 is placed in Swing Attack circle
Goblin4, Goblin5, and Goblin6 are placed in Thrust Attack circle
(All Attack circles must be filled)
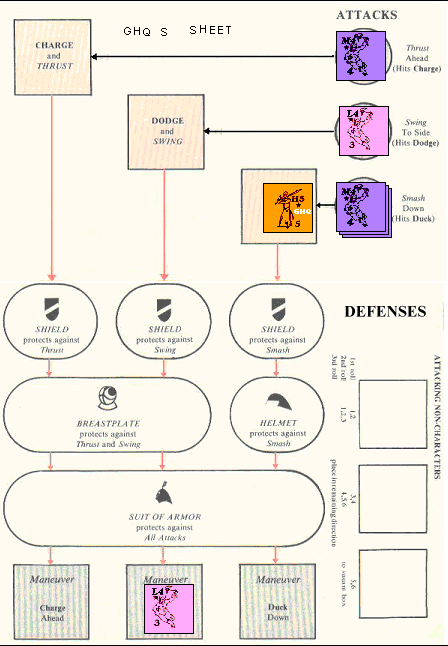
d. Repositioning/Change Tactics
Goblin1 repositioning roll=1(left box unchanged).
Goblin1 moves to Dodge Maneuver box and doesn't change tactics(4,2).
Attacking Goblins repositioning roll=2(middle box unchanged).
Goblin2 goes to Thrust and doesn't change tactics(5,1).
Goblin3 stays in Swing and doesn't change tactics(4,1).
Goblin4-Goblin6 move to Smash and don't change tactics(5,1)
GHQ, on his own sheet, does not reposition or change tactics
(See image)

e. Resolving Attacks
GHQ misses
Goblin1 hits by undercutting
Goblin3 hits by undercutting
Goblin2 hits by undercutting
Goblin4-Goblin6 hit by matching directions
f. Inflicting Harm:
Goblin1 does Light damage + Fumble Table[(5,6)-1(speed differential)+4(doesn't
match directions=9(decrease two levels)]=Negligible harm.
Goblin2 does Medium damage + Fumble Table[(4,1)-1(speed differential)+4(doesn't
match directions)=7(decrease one levels)]=Light harm.
Goblin3 does Light damage + Fumble Table[(5,4)-1(speed differential)+4(doesn't
match direcitons)=8(decrease one level)]=Negligible harm.
Goblin4 does Medium damage + Fumble Table[(1,1)-1(speed differential)=0(increase
two levels)]=Tremendous harm exceeds GHQ's Heavy vulnerabilty. GHQ
is KILLED.
Goblin5 and Goblin6 attacks are canceled.
3. Fatigue Step: none
Combat ends in Caves 2 with the triumphant Goblins trying on GHQ's
armor. Guard treasures stay on Setup Card until GHQ regenerates.
The Captain loses 6 Notoriety for the death of his hired hand.
Cliff 3
The Black Knight, Berserker, Swordsman (and his hired Rogues, R2
and R3) are unhidden. The White Knight, Pilgrim, O1, and O2 are
hidden.
Round 1
1. Encounter Step: Each activity is done starting with the first
character move during the day (the Swordsman) and continuing around
in "board order" (the same order we used to build the
board), skipping characters who are not in the clearing. Thus the
order of activities is:
1. Swordsman
2. White Knight
3. Pilgrim
4. Black Knight
5. Berserker
a: Luring: no unhired denizens to lure
b. Random Assignment: no unhired denizens to assign
c. Deployment/Charging: none of the characters elects to charge
or deploy natives
d. Actions:
Swordsman does no action
White Knight alerts Morning Star with Fight H6
Pilgrim alerts Spear with Fight M5
Black Knight does no action
Berserker does no action
2. Melee Step (random order):
Swordsman does not target anyone
Black Knight does not target anyone
Berserker does not target anyone
Pilgrim does not target anyone
White Knight does not target anyone
3. Fatigue Step: none
Round 2
1. Encounter Step: (Swordsman, White Knight, Pilgrim, Black Knight,
Berserker)
a. Luring: none
b. Random Assignment: none
c. Deployment/Charging: none
d. Actions:
Swordsman activates the Good Book
The White Knight plays Move H6 to run out of clearing toward Cliff
6. He spends the night in the secret passage and must begin Day
19 with one move to Cliff 3 or two move phases to Cliff 6.
Pilgrim unalerts his Spear
Black Knight does nothing
Berserker does nothing.
2. Melee Step: no one selects a target
3. Fatigue Step: none
Combat rounds end due to two uneventful rounds. The Swordsman trades
the Good Book to the hidden Pilgrim for the Power Gauntlets and
6 gold.
Deep Woods 1
The Captain gives the Hidden Ring to the Wizard, who activates it.
MIDNIGHT
Midnight falls on a peaceful Realm.
Day 19 Daylight
orders due Tuesday, September 28, 9pm EDT.
|
